My first blog post on OpenFaaS.com shows how you can run open-source serverless functions on AWS Fargate
This article explains reasons for choosing AWS Fargate and simple steps to install the software and create your first function.
My first blog post on OpenFaaS.com shows how you can run open-source serverless functions on AWS Fargate
This article explains reasons for choosing AWS Fargate and simple steps to install the software and create your first function.
In this video I show you how to deploy and manage OpenFaaS function using terraform
References:
OpenFaaS: https://www.openfaas.com/
OpenFaaS Terraform Provider: https://github.com/ewilde/terraform-provider-openfaas
This is a talk I gave in May 2018 at KubeCon Copenhagen:
Form3 delivers cloud-based connectivity, payment processing, clearing and settlement services to a wide range of regulated financial institutions. Every transaction in fintech represents real money from real people. Protecting the integrity of service communication here is key. In this talk, I describe how Form3 built a payments platform that is reliable, safe, and resilient. I start by looking at a previous generation system that suffered from unreliable messaging and poor tail latencies. I then cover modern design techniques used to solve those legacy problems. This talk examines how Linkerd is used and deployed to protect financial transactions from failure and latency. Warning this talk contains live demonstrations!
This post looks at how you can configure linkerd to use consul as a service discovery backend
Part of a series on linkerd:
* Part one linkerd and consul
The following components make up the sample system:
* curl which acts as our client application
* linkerd for proxying requests to our service
* audit example service which has a /health endpoint
* consul as our service discovery back-end
* consul-registrator
to automatically registers services with consul
System overview
+--------+      +---------+    +-----------------+
| client +----> | linkerd +--> | service (audit) |
+--------+      +----^----+    +-------+---------+
                     |                 |
                +----+---+     +-------v------------+
                | consul <-----+ consul registrator |
                +--------+     +--------------------+
The sample code for this can be found here: https://github.com/ewilde/linkerd-examples/tree/master/post-1
curl -H "Host: api.company.com" http://localhost:4140/audit/health -i
Should look up the service named audit in the consul catalog and call the service with GET /health
namers:
- kind: io.l5d.consul
  includeTag: false
  useHealthCheck: false
routers:
- protocol: http
  label: /http-consul
  identifier:
   kind: io.l5d.path
   segments: 1
   consume: true
  dtab: |
    /svc => /#/io.l5d.consul/dc1;
  servers:
  - port: 4140
    ip: 0.0.0.0
curl -H "Host: audit.company.com" http://localhost:4140/health -i
Should look up the service named audit in the consul catalog and call the service with GET /health
namers:
- kind: io.l5d.consul
  includeTag: false
  useHealthCheck: false

routers:
- protocol: http
  label: /host/http-consul
  identifier:
   kind: io.l5d.header.token
  dtab: |
    /consul  => /#/io.l5d.consul/dc1;
    /svc     => /$/io.buoyant.http.subdomainOfPfx/company.com/consul;
  servers:
  - port: 4140
    ip: 0.0.0.0
Written with StackEdit.
At home I use Ubuntu, consul and (vault)[https://vaultproject.io] quite a bit, here is how I get consul to startup when my computer boots up using systemd
#!/usr/bin/env bash
set -e

echo "Installing dependencies..."
if [ -x "$(command -v apt-get)" ]; then
  sudo apt-get update -y
  sudo apt-get install -y unzip
else
  sudo yum update -y
  sudo yum install -y unzip wget
fi


echo "Fetching Consul..."
CONSUL=0.7.5
cd /tmp
wget https://releases.hashicorp.com/consul/${CONSUL}/consul_${CONSUL}_linux_amd64.zip -O consul.zip
wget https://github.com/hashicorp/consul/blob/master/terraform/shared/scripts/rhel_consul.service -O consul.service

echo "Installing Consul..."
unzip consul.zip >/dev/null
chmod +x consul
sudo mv consul /usr/local/bin/consul
sudo mkdir -p /opt/consul/data


# Write the flags to a temporary file
cat >/tmp/consul_flags << EOF
CONSUL_FLAGS="-server -bind=192.168.1.97 -ui -data-dir=/opt/consul/data -bootstrap-expect 1"
EOF

if [ -f /tmp/upstart.conf ];
then
  echo "Installing Upstart service..."
  sudo mkdir -p /etc/consul.d
  sudo mkdir -p /etc/service
  sudo chown root:root /tmp/upstart.conf
  sudo mv /tmp/upstart.conf /etc/init/consul.conf
  sudo chmod 0644 /etc/init/consul.conf
  sudo mv /tmp/consul_flags /etc/service/consul
  sudo chmod 0644 /etc/service/consul
else
  echo "Installing Systemd service..."
  sudo mkdir -p /etc/systemd/system/consul.d
  sudo chown root:root /tmp/consul.service
  sudo mv /tmp/consul.service /etc/systemd/system/consul.service
  sudo chmod 0644 /etc/systemd/system/consul.service
  sudo mv /tmp/consul_flags /etc/default/consul
  sudo chown root:root /etc/default/consul
  sudo chmod 0644 /etc/default/consul
fi
I adapted this script from https://github.com/hashicorp/consul/blob/master/terraform/shared/scripts/install.sh
Written with StackEdit.
I wasted quite a bit of time today figuring out how to compile kong on my mac, so here it is:
brew update
brew install pcre openssl openresty
Kong is compiled against lua 5.1
curl -R -O https://www.lua.org/ftp/lua-5.1.5.tar.gz
tar zxf lua-5.1.5.tar.gz
cd lua-5.1.5
make macosx
sudo make install
Luarocks is a package manager that kong uses
git clone git@github.com:luarocks/luarocks.git
cd luarocks
./configure
make install
$ git clone git@github.com:Mashape/kong.git
$ sudo make install
Note: I’m sure there are better ways of doing this!
I wanted a convenient way to switch aws command line environment variables based on my desired profile
Below are the environment variables a wanted to swap based on configured profiles
| Name | Description |
|---|---|
| AWS_ACCESS_KEY_ID | AWS access key. |
| AWS_SECRET_ACCESS_KEY | AWS secret key. Access and secret key variables override credentials stored in credential and config files. |
| AWS_DEFAULT_REGION | AWS region. This variable overrides the default region of the in-use profile, if set. |
You can configure your credentials profiles in ~/.aws/credentials.
[default]
aws_access_key_id=AKIAIOSFODNN7123456890
aws_secret_access_key=wJalrXUtnFEMI/K7MDENG/bPxRfiCY123456890

[ed]
aws_access_key_id=AKIAI44QH8DHB123456890
aws_secret_access_key=je7MtGbClwBF/2Zp9Utk/h3yCo8nvb123456890
And your other settings in ~/.aws/config
[default]
output = json
region = us-east-1

[profile ed]
output = json
region = eu-west-1
> Note you can create these by hand or use `aws config –profile’ which is easier
The function below is really simple and uses aws config get to set the appropriate environment variable for the profile you have selected
 function aws-profile -- 'Switch aws profile'
     set -gx AWS_ACCESS_KEY_ID (aws configure get --profile $argv aws_access_key_id)
      set -gx AWS_SECRET_ACCESS_KEY (aws configure get --profile $argv aws_secret_access_key)
      set -gx AWS_DEFAULT_REGION (aws configure get --profile $argv region)
      echo Profile switched to $argv
      echo  AWS_ACCESS_KEY_ID $AWS_ACCESS_KEY_ID
      echo  AWS_SECRET_ACCESS_KEY $AWS_SECRET_ACCESS_KEY
      echo  AWS_DEFAULT_REGION $AWS_DEFAULT_REGION
end
$ aws-profile ed

Profile switched to ed
AWS_ACCESS_KEY_ID AKIAI44QH8DHB123456890
AWS_SECRET_ACCESS_KEY je7MtGbClwBF/2Zp9Utk/h3yCo8nvb123456890
AWS_DEFAULT_REGION eu-west-1
This article explains how to create an oauth2 custom authorizer for amazon’s AWS API Gateway.
I wanted to use the oauth2 client credentials grant, also known as 2-legged oauth 2 workflow, see: http://oauthbible.com/#oauth-2-two-legged. This kind of workflow is useful for machine to machine communication, where the client machine is also the resource owner.
     +---------+                                  +---------------+
     |         |                                  |               |
     |         |>--(A)- Client Authentication --->| Authorization |
     | Client  |                                  |     Server    |
     |         |<--(B)---- Access Token ---------<|               |
     |         |                                  |               |
     +---------+                                  +---------------+

                     Figure 6: Client Credentials Flow
Ref: https://tools.ietf.org/html/draft-ietf-oauth-v2-31#section-4.4
If you struggle to workout which grant type use, this diagram can be useful:

Ref: https://oauth2.thephpleague.com/authorization-server/which-grant/
To implement oauth in api gateway we need to carry out the following tasks, which are covered in detail later on:
The first task was to evaluate what software I could use to act as an authorization and resource server. In order that the custom lambda authorizer could validate a token, I needed an implementation to expose a token validation endpoint as well as the normal token creation endpoint.
Below is a list of candidates I looked at
| Software | Language | Description |
|---|---|---|
| Hydra | Go | Opensource. Good documentation. Responsive maintainer(s), PR merged same day. API for token validation |
| PHP OAuth 2.0 Server | PHP | Opensource. Good documentation. Unsure if it can validate tokens via an api? |
| Spring Security OAuth | Java | Opensource. Good documentation. API for token validation |
I also took a quick look at some other implementations, see: https://oauth.net/code/. In this article I choose to use hydra mainly because i’m familiar with Go, it supported token verification using an api and looked really straight forward to setup and configure
I ran hydra using the published docker image: https://hub.docker.com/r/oryam/hydra/
docker run -d --name hydra \
    -p 4444:4444 \
    -e SYSTEM_SECRET='3bu>TMTNQzMvUtFrtrpJEMsErKo?gVuW' \
    -e FORCE_ROOT_CLIENT_CREDENTIALS='8c97eaed-f270-4b2f-9930-03f85160612a:MxGdwYBLZw7qFkUKCFQUeNyvher@jpC]' \
    -e HTTPS_TLS_CERT_PATH=/server.crt \
    -e HTTPS_TLS_KEY_PATH=/key.pem \
    -v $(pwd)/server.crt:/server.crt \
    -v $(pwd)/key.pem:/key.pem oryam/hydra
This sets up hydra to use ssl and seeds the root credentials, which is used later on perform administrative tasks with hydra
The api gateway lamda authentication function will need to communicate with the hydra. I choose to secure this communication using SSL/TLS. If you don’t have an SSL certificate for your hydra instance, you could buy one or you can create your own self-signed certificate (for internal usage or test purposes). I choose to go down the self-signed root.
openssl genrsa 2048 > key.pemopenssl req -new -key key.pem -out cert.csropenssl x509 -req -days 3650 -in cert.csr -signkey key.pem -out server.crtYou can now use key.pem and server.crt to run the docker container as above.
System token is used to perform administrative interactions with hydra, such as creating clients, validating tokens etc. In the -u (username:password) this is the system client id and secret set in the FORCE_ROOT_CLIENT_CREDENTIALS environment variable
Request
curl -k -X POST \
    -d grant_type=client_credentials \
    -d scope='hydra hydra.clients' \
    https://oauth.mycompany.local/oauth2/token
Result
{
  "access_token": "fIyy-W3j2cmNSP40GK9HmQ9wlmhzFpdcxia64JHN3po.ww3Ob46pPaj1tz_XfXG80BAnLy5XbwuLqSjmwnqh6Ks",
  "expires_in": 3599,
  "scope": "hydra hydra.clients",
  "token_type": "bearer"
}
Create client, this is a user of your api
Request
curl -k -X POST \
    -H 'Authorization: bearer fIyy-W3j2cmNSP40GK9HmQ9wlmhzFpdcxia64JHN3po.ww3Ob46pPaj1tz_XfXG80BAnLy5XbwuLqSjmwnqh6Ks' \
    -d '{"id":"3094A219-52B1-4900-91F7-514C4392D8C3","client_name":"Client1","grant_types":["client_credentials"],"response_types":["code"],"public":false}' \
    https://oauth.mycompany.local/clients
Note: In the request authorization header we use the
access_tokenwe obtained from the previous step. We also specify the client will access the system using theclient_credentialsgrant.
Result
{
  "id": "3094A219-52B1-4900-91F7-514C4392D8C3",
  "client_name": "Client1",
  "client_secret": "(SDk!*ximQS*",
  "redirect_uris": null,
  "grant_types": [
    "client_credentials"
  ],
  "response_types": [
    "code"
  ],
  "scope": "",
  "owner": "",
  "policy_uri": "",
  "tos_uri": "",
  "client_uri": "",
  "logo_uri": "",
  "contacts": null,
  "public": false
}
Note: The
client_secrethas been generated.client_idandclient_secretare used by the client to (create tokens)[]
In our example we are creating two types of clients, read only and write clients. The curl command below defines the read policy and associates it with subjects, which in the context of hydra, are a comma separated list of client ids.
Request
curl -k -X POST -H \
    'Authorization: bearer fIyy-W3j2cmNSP40GK9HmQ9wlmhzFpdcxia64JHN3po.ww3Ob46pPaj1tz_XfXG80BAnLy5XbwuLqSjmwnqh6Ks' \
    -d '{"description":"Api readonly policy.","subjects":["3094A219-52B1-4900-91F7-514C4392D8C3"],"actions":["read"],"effect":"allow","resources":["resources:orders:<.*>"]}'  \
https://oauth.mycompany.local/policies
Note: In the above request we specify which resources the policy applies to. In our example we are specifying that the
ordersresource is having a policy applied. The “ is a wild card identifier which applies the policy to orders and any sub resources.
Response
{
  "id": "03c59a92-1fa6-4df9-ad1e-e5d551bc2c71",
  "description": "Api readonly policy.",
  "subjects": [
    "3094A219-52B1-4900-91F7-514C4392D8C3"
  ],
  "effect": "allow",
  "resources": [
    "resources:orders:<.*>"
  ],
  "actions": [
    "read"
  ],
  "conditions": {}
}
This call is issued by the client application
Request
curl -k -X POST \
    -d grant_type=client_credentials \
    -u '3094A219-52B1-4900-91F7-514C4392D8C3:(SDk!*ximQS*' \
    https://oauth.mycompany.local/oauth2/token
Result
{
  "access_token": "1z4Bb_r8lgmUKaD1FyOgP0tBJ_UIafhX2-QyIvUgLN8.NHdZ3zm4Ly6mepP7flGJQMN6-YfKox3OyPPZiiMg-mk",
  "expires_in": 3599,
  "scope": "",
  "token_type": "bearer"
}
This is the call that the lambda function will need to make to validate a client token
Request
curl -k -X POST \
    -H 'Authorization: bearer fIyy-W3j2cmNSP40GK9HmQ9wlmhzFpdcxia64JHN3po.ww3Ob46pPaj1tz_XfXG80BAnLy5XbwuLqSjmwnqh6Ks' \
    -d 'token=1z4Bb_r8lgmUKaD1FyOgP0tBJ_UIafhX2-QyIvUgLN8.NHdZ3zm4Ly6mepP7flGJQMN6-YfKox3OyPPZiiMg-mk' \
    https://oauth.mycompany.local/oauth2/introspect
Response
{"active":true,"client_id":"Client1","sub":"Client1","exp":1481975503,"iat":1481971902,"aud":"Client1"}
This call could be used by the lambda function as an alternative, perhaps mapping the http verb to the policy, i.e GET=read or POST=write
Request
curl -X POST -k \
    -H 'Authorization: bearer fIyy-W3j2cmNSP40GK9HmQ9wlmhzFpdcxia64JHN3po.ww3Ob46pPaj1tz_XfXG80BAnLy5XbwuLqSjmwnqh6Ks' \
    -d '{"token":"1z4Bb_r8lgmUKaD1FyOgP0tBJ_UIafhX2-QyIvUgLN8.NHdZ3zm4Ly6mepP7flGJQMN6-YfKox3OyPPZiiMg-mk","subject":"Client1","action":"read","resource":"resources:orders:123"}'  https://oauth.mycompany.local/warden/token/allowed
Response – Allowed
{"sub":"Client1","scopes":[],"iss":"hydra.localhost","aud":"Client1","iat":"2016-12-17T10:51:42.917937398Z","exp":"2016-12-17T11:51:43.049266177Z","ext":null,"allowed":true}
This call is useful for a loadbalancer ALB or ELB to determine if a node is active or not.
Request
curl -k https://oauth.mycompany.local/health -i
Response
Note that there is no content with this response, which is why I included the -i curl parameter to show the response code
HTTP/1.1 204 No Content
Date: Mon, 19 Dec 2016 10:04:59 GMT
Next up we examine how to create the lambda function to call our hydra server. The code for this authorizer can be found on github: https://github.com/ewilde/oauth2-api-gateway. I used the serverless framework to help me build and deploy the authorizer and test endpoint
Note: This is the first node application i’ve written, so apologies if it’s not very idiomatic.
serverless.yml
functions:
  hello:
    handler: functions/handler.hello
    events:
      - http:
          path: hello
          authorizer: auth
          method: get
          vpc:
            securityGroupIds:
              - sg-575c752a
            subnetIds:
              - subnet-35561a7c
              - subnet-4e44d315
              - subnet-454bd668
auth.js
I wrote a simple javascript library to interact with hydra which we instantiate here to use later on when validating an incoming token.
var HydraClient = require('./hydra');
var client = new HydraClient();
Below is the function to create the policy document to return to the api gateway when a client presents a valid token
const generatePolicy = (principalId, effect, resource) => {
    const authResponse = {};
    authResponse.principalId = principalId;
    if (effect && resource) {
        const policyDocument = {};
        policyDocument.Version = '2012-10-17';
        policyDocument.Statement = [];
        const statementOne = {};
        statementOne.Action = 'execute-api:Invoke';
        statementOne.Effect = effect;
        statementOne.Resource = resource;
        policyDocument.Statement[0] = statementOne;
        authResponse.policyDocument = policyDocument;
    }
    return authResponse;
};
Below is the actual authorization method that is called by the api gateway. It validates the incoming request and returns either:
module.exports.auth = (event, context) => {
    client.validateTokenAsync({
        'access_token': event.authorizationToken
    }, function (result) {
        if (result == null) {
            console.log(event.authorizationToken + ': did not get a result back from token validation');
            context.fail('Error: Invalid token');
        } else if (!result.active) {
            console.log(event.authorizationToken + ': token no longer active');
            context.fail('Unauthorized');
        } else {
            console.log(event.authorizationToken + ': token is active will allow.');
            console.log('principle: ' + result.client_id + ' methodArm: ' + event.methodArn);
            var policy = generatePolicy('user|' + result.client_id, 'allow', event.methodArn);
            console.log('policy: ' + JSON.stringify(policy));
            context.succeed(policy);
        }
    });
};
hydra client
The function below calls hydra to make sure the token is valid and that the TTL has not expired
function validateToken(systemToken, clientToken, callback) {
    var tokenParsed = clientToken.access_token.replace('bearer ', '');
    console.log('Validating client token:' + tokenParsed);

    var request = require('request');
    request.post(
        {
            url: constants.base_auth_url + '/oauth2/introspect',
            agentOptions: {
                ca: constants.self_signed_cert
            },
            headers: {
                'Authorization' : 'bearer ' + systemToken.access_token
            },
            form: {
                token: tokenParsed
            }
        },
        function (error, response, body) {
            if (!error && response.statusCode >= 200 && response.statusCode < 300) {
                var result = JSON.parse(body);
                callback(result);
            }
            else {
                console.log(response);
                console.log(body);
                console.log(error);
                callback(null);
            }
        });
}
##Configuring the API gateway and testing the application
Because we used serverless in this example there is really nothing to be done here. The serverless.yml configures the authorizer:
authorizer: auth for the endpoint /hello
To test the application:
Authorization headerAlex Bilbie – OAuth 2 and API Security
Covers different grant types and what they’re each appropriate for, as well as discuss some potential API security strategies for one of Adam’s personal projects.
http://www.fullstackradio.com/4
Thought machine – API Gateway and lambda
Interesting discussion on lambda architectures
http://martinfowler.com/articles/serverless.html
Interview with Mike Roberts discussing serverless architectures
The crane assemble command see full docs allows you to add a fully featured build script to you existing project. The video below shows this in action:
For more information visit the crane docs or check us out on github
Visit us on github https://github.com/ewilde/crane

crane is a command line tool the I developed with Kevin Holditch. It kick starts development of a new project by templating the boring bits.
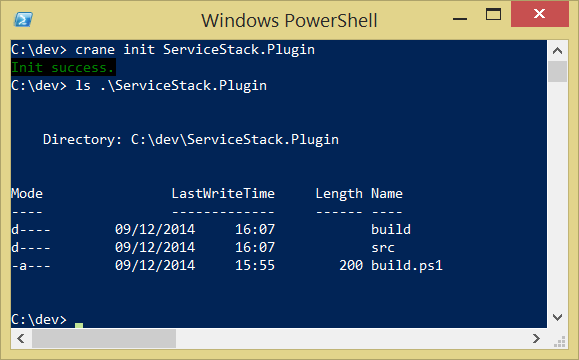
crane init ServiceStack.Plugin
Running this command creates the following items
First initialize a new project using the syntax crane init {project name}

It creates a directory using the the project name given in the init command
You can immediately build the project. Just run .\build.ps1 from the project directory

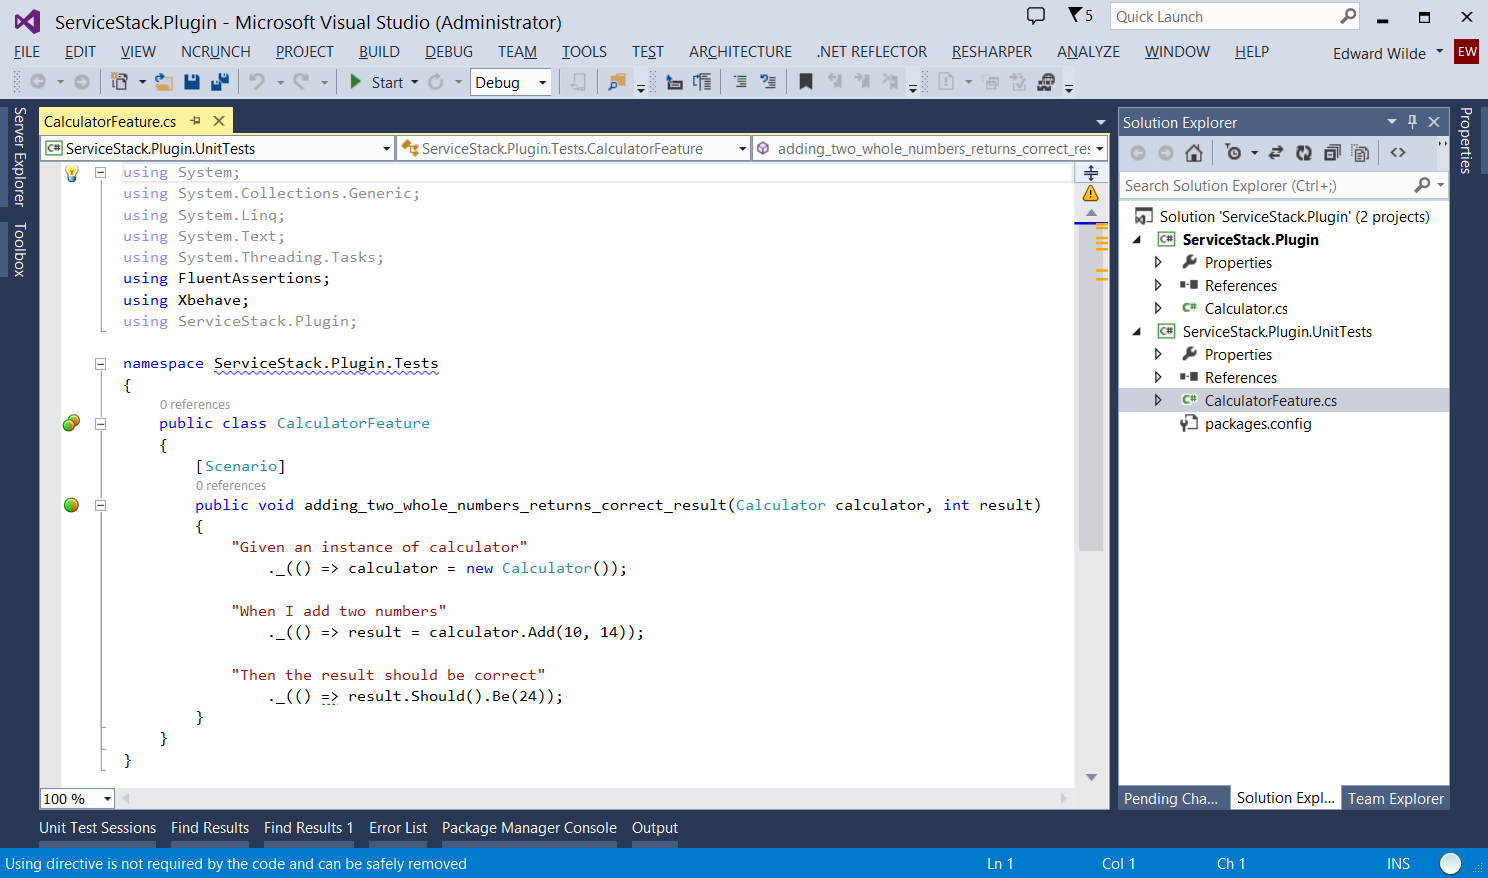
Here’s what it looks like in Visual Studio if you open the solution file: